Here is the code snippet that you can use to create a shortcode and use it in any of your posts or pages to display the price of a specific product. You just have to specify the woocommerce product ID of that product like the given example. [woo_product_price id=20]
You may want to show different Advanced Custom Field group based on status of your Woocommerce order status. Here we discuss the steps you can take to achieve this easily. You should know two basic things before we get started.
Woocommerce Order status types :
Woocommerce orders are a custom post type and order status types are simply the post status types of post type order. For the default post type, the main post status types are “published”, “future”, “draft”, “pending”and “trash”.
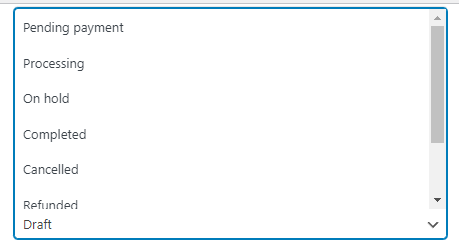
But for Woocommerce order post type, the status types are the following : “Pending Payment”, “Processing”, “On hold”, “Completed”, “Cancelled”, “Refunded”, “Failed” and “Draft”.
Woocommerce Order Status Types
ACF feature to show or hide custom field group based on status type :
ACF location
If you edit your ACF field group, you will see Location section which allows you to set rules to show or hide your custom field group. We will use this feature to show or hide a field group from Woocommerce orders.
STEPS to show or hide ACF field based on Woocommerce order status
STEP 1 : Click on edit for your ACF field group and in the edit screen. go to Location section.
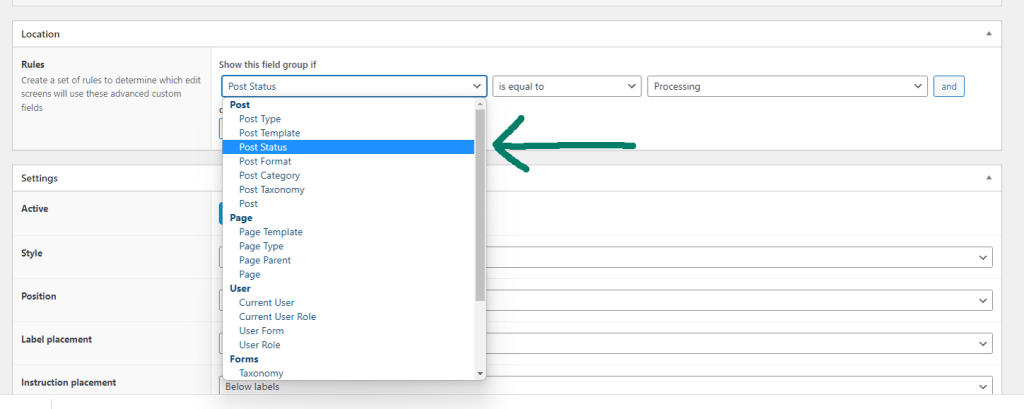
STEP 2 : Select Post Status under post from the first dropdown.
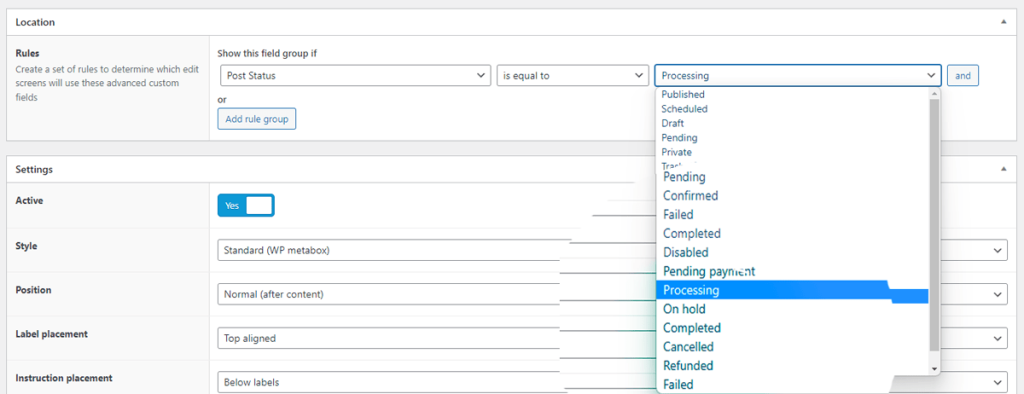
Select from Woocommerce Status Types
STEP 3: Select your desired Woocommerce order status from the last dropdown and click update.
That’s it, you are done. and now you will have your field group to show on the order edit screen based on your order status. 🙂
If you have any question please feel free to contact via the comment form below, i reply to all queries. You can also contact me via the contact page form.
You can use the WooCommerce filter woocommerce_get_price_html and woocommerce_cart_item_price to add a string before or after the price in WooCommerce product and cart pages.
Here is the code that you can copy and paste in your active theme’s functions.php file:
function wptips_custom_html_addon_to_price( $price, $product ) {
 $html_price_prefix = '<span class="price-prefix">prefix</span>'; // custom prefix html that you want to add before price
 $html_price_suffix = '<span class="price-suffix"> suffix</span>'; // custom suffix html that you want to add after price

 if ( !empty( $price ) ) {
	 $price = $html_price_prefix . ' ' . $price . ' ' . $html_price_suffix;
	  return $price;
	} else {
	  return $price;
	}
}
add_filter( 'woocommerce_get_price_html', 'wptips_custom_html_addon_to_price', 999, 2 );
add_filter( 'woocommerce_cart_item_price', 'wptips_custom_html_addon_to_price', 999, 2 );
You can use the above simple code snippet in your active theme, or use the code in a custom plugin to add text next to the price in WooCommerce. You can also add a prefix or suffix HTML or TEXT to the price on the product page and cart page as well.
Recently, I got a request to add additional text under the product name on the checkout page. It seemed an easy job. All I had to do was create a file at woocommerce/checkout/review-order.php in, the active theme’s directory. But it didn’t work. Because the CartFlow plugin was overwriting some WooCommerce templates.
List of WooCommerce templates that CartFlow plugin overwrites :
Cart
cart/cart-shipping.php
Checkout
checkout/form-billing.php
checkout/form-checkout.php
checkout/form-coupon.php
checkout/form-login.php
checkout/form-shipping.php
checkout/payment.php
checkout/payment-method.php
checkout/review-order.php
checkout/thankyou.php
Global
global/form-login.php
Notices
notices/error.php
notices/notice.php
notices/success.php
Order
order/order-details.php
Now, all we have to do is use, “woocommerce_locate_template” filter to force woocommerce to use our custom defined templates, instead of the templates defined in CartFlow.
Here is the code snippet to overwrite CartFlow templates :
// source : https://wordpress.org/support/topic/cartflows-overwrites-woocommerce-templates-in-child-theme/

add_filter( 'woocommerce_locate_template', 'wptips_locate_template', 21, 3 );

function wptips_locate_template( $template, $template_name, $template_path ){

	global $woocommerce;
		$_template = $template;

		if ( ! $template_path ) {
			$template_path = $woocommerce->template_url;
		}

        //You can change this Path to match your plugin or theme , where you have defined custom woocommerce templates.
		$my_woocommerce_template_path = get_bloginfo('stylesheet_directory') . '/woocommerce/';
		$template    = locate_template(
			array(
				$template_path . $template_name,
				$template_name,
			)
		);
		// Get the template from the active theme, if it exists
		if ( ! $template && file_exists( $my_woocommerce_template_path . $template_name ) ) {
			$template = $my_woocommerce_template_path . $template_name;
		}
		// Use default template
		if ( ! $template ) {
			$template = $_template;
		}
		// Return what we found
		return $template;
}
You can implement the above code in your theme’s functions.php file, and it will force WooCommerce to use the templates defined in your active theme.
Feel free to comment here, if you have any questions. I would love to help you out. 🙂
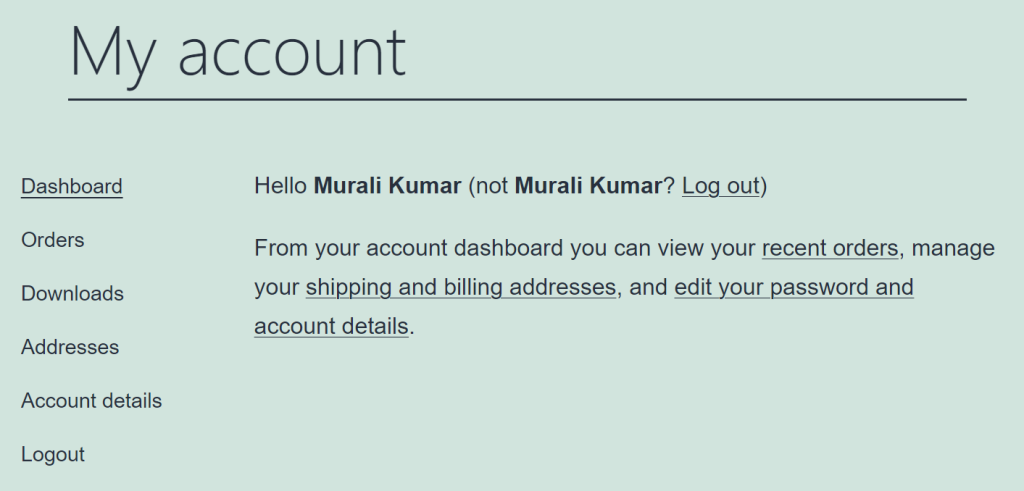
When you install Woocommerce on your website, it will automatically create a My Accountpage for you. If you visit the My Account Page, you will see a customer account related menu links in it. Check out the screenshot below :
Woocommerce My account Menu Links
Why change the My Account menu?
There are scenarios when you may not need some of the links or may want to customize them in the My Account page. Here are three example scenarios :
If you are selling physical products from your woocommerce based website, you may not need the Downloads URL.
If you are selling Digital Products, you may not need the Address URL from your My account menu.
You may want to rename the Dashboard text or add your own custom URL to the My account navigation.
How to remove URLs from My Account menu in woocommerce without code
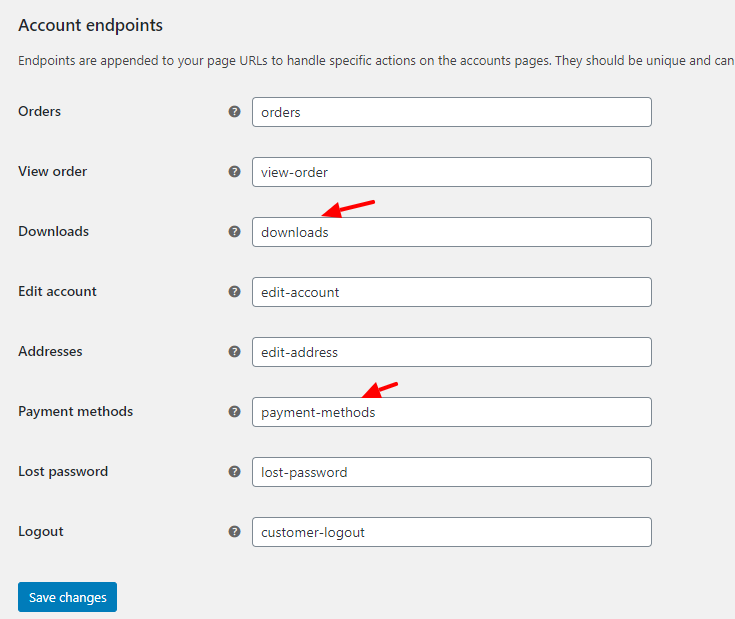
From the woocommerce endpoints section, you can change the slug of the many customer-related pages under my account, like Orders page, View order, Downloads, Edit Account, Address, Payment Methods, Lost password and Log out. First visit the Woocommerce Endpoints settings, you have to visit WooCommerce >> Settings >> Advanced.
WooCommerce My Account Endpoint
Then, scroll down to the Account endpoints section and there you can change many customer accounts related page slug. You can simply remove the slug of Downloads or Payment Methods or Addresses, Log out section and keep it blank to hide it from My Account navigation in the front end.
Here is a video explaining how you can use woocommerce endpoints to remove links from “My Account” menu
How to remove any link from My Account menu in woocommerce with code
You can easily customize the My Account menu items by using the woocommerce_account_menu_items filter. Here the code snippet is given below, which you can use to remove Dashboard URL, Orders URL, Downloads URL, Edit Account URL, Payment Methods URL, AddressURL or Log out URL from the My Account menu. Just comment out the one that you don’t want to hide with a double slash ( // ) at the beginning of the line.
/**
Snippet to remove any URL from My Account menu in woocommerce
Source : https://staging.wpboys.com/?p=307
**/

add_filter ( 'woocommerce_account_menu_items', 'wptips_customize_account_menu_items' );
function wptips_customize_account_menu_items( $menu_items ){

	//unset( $menu_items['dashboard'] ); // Remove Dashboard from My Account Menu
	//unset( $menu_items['orders'] ); // Remove Orders from My Account Menu
	unset( $menu_items['downloads'] ); // Remove Downloads from My Account Menu
	//unset( $menu_items['edit-account'] ); // Remove Account details from My Account Menu
	unset( $menu_items['payment-methods'] ); // Remove Payment Methods from My Account Menu
	//unset( $menu_items['edit-address'] ); // Addresses from My Account Menu
	//unset( $menu_items['customer-logout'] ); // Remove Logout link from My Account Menu
return $menu_items;

}
How to change any menu item label from My Account Menu section
add_filter ( 'woocommerce_account_menu_items', 'wptips_customize_account_menu_items' );
 function wptips_customize_account_menu_items( $menu_items ){

	// Chnage the Menu Item name text
	$menu_items['dashboard'] = 'My Account'; // Rename "Dasboard" in My Account menu to 'My Account'
	$menu_items['orders'] = 'My Orders'; // Rename 'Ordrers' to 'My Orders'
	$menu_items['edit-address'] = 'My Addresses'; //Rename 'Addresses' to 'My Addresses'

	return $menu_items;
}
How to add a custom URL to the My Account menu in any position
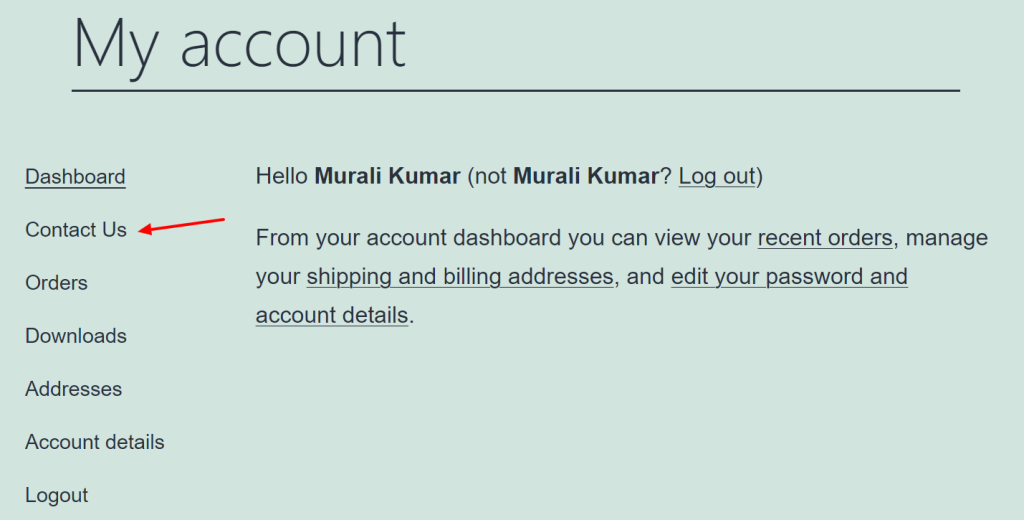
Add Custom URL in My Account menu in any position
// add custom endpoint for My Account menu
add_filter ( 'woocommerce_account_menu_items', 'wptips_customize_account_menu_items' );
function wptips_customize_account_menu_items( $menu_items ){
 	// Add new Custom URL in My Account Menu
	$new_menu_item = array('contact-us'=>'Contact Us');  // Define a new array with cutom URL slug and menu label text
	$new_menu_item_position=2; // Define Position at which the New URL has to be inserted

	array_splice( $menu_items, ($new_menu_item_position-1), 0, $new_menu_item );
	return $menu_items;
}

// point the endpoint to a custom URL
add_filter( 'woocommerce_get_endpoint_url', 'wptips_custom_woo_endpoint', 10, 2 );
function wptips_custom_woo_endpoint( $url, $endpoint ){
 	if( $endpoint == 'contact-us' ) {
		$url = 'https://staging.wpboys.com/contact-me/'; // Your custom URL to add to the My Account menu
	}
	return $url;
}
Reply here in the comment section with your questions if any.
Let’s say you want users to click a buy now button, and it should add a particular product with a certain quantity to the cart by removing all other items. That’s when you will need this code handy. Just paste it into the functions.php file of your currently active theme.
// remove old items in cart when new items added
	add_filter('woocommerce_add_to_cart_validation', 'remove_cart_item_before_add_to_cart', 1, 3);
	function remove_cart_item_before_add_to_cart($passed, $product_id, $quantity) {
		if (!WC()->cart->is_empty()) {
			WC()->cart->empty_cart();
		}

		return $passed;
	}