Tag: nginx

  • How to restore the real IP address of the visitor if your web application is behind Cloudflare

    If your web application is behind Cloudflare and you try to access the IP address of the visitor in your application, it will always show Cloudflare IP addresses, to fix this, you need to replace the Cloudflare IP address with the real IP address of the respective visitor.

    Cloudflare IP addresses :

    First of all, you need to know the IP addresses of Cloudflare.

    How to restore the real IP of the visitor in the Nginx server:

    Add the following Nginx rules to restore the real IP addresses of the visitor.

    # Cloudflare IPv4 addresses  ( IPV4 addresses that you got from https://www.cloudflare.com/ips-v4 ) 
    set_real_ip_from 173.245.48.0/20;
    set_real_ip_from 103.21.244.0/22;
    set_real_ip_from 103.22.200.0/22;
    set_real_ip_from 103.31.4.0/22;
    set_real_ip_from 141.101.64.0/18;
    set_real_ip_from 108.162.192.0/18;
    set_real_ip_from 190.93.240.0/20;
    set_real_ip_from 188.114.96.0/20;
    set_real_ip_from 197.234.240.0/22;
    set_real_ip_from 198.41.128.0/17;
    set_real_ip_from 162.158.0.0/15;
    set_real_ip_from 104.16.0.0/13;
    set_real_ip_from 104.24.0.0/14;
    set_real_ip_from 172.64.0.0/13;
    set_real_ip_from 131.0.72.0/22;
    
    # Cloudflare IPv6 addresses ( IPV6 addresses that you got from https://www.cloudflare.com/ips-v6 )
    set_real_ip_from 2400:cb00::/32;
    set_real_ip_from 2606:4700::/32;
    set_real_ip_from 2803:f800::/32;
    set_real_ip_from 2405:b500::/32;
    set_real_ip_from 2405:8100::/32;
    set_real_ip_from 2a06:98c0::/29;
    set_real_ip_from 2c0f:f248::/32;
    
    real_ip_header X-Forwarded-For;

    If you have multiple domains in a single Nginx server, then you have to make sure that the rules are applied globally on all the sites in the server or if it’s a single site, make sure that the rules are applied only for that particular web application.
  • How to serve WebP images dynamically in RunCloud using EWWW Image Optimizer plugin

    You can use EWWW Image Optimizer plugin to serve WebP images on your website. But you will have to implement some Nginx configurations in your RunCloud server to be able to achieve it. Follow the instructions below.

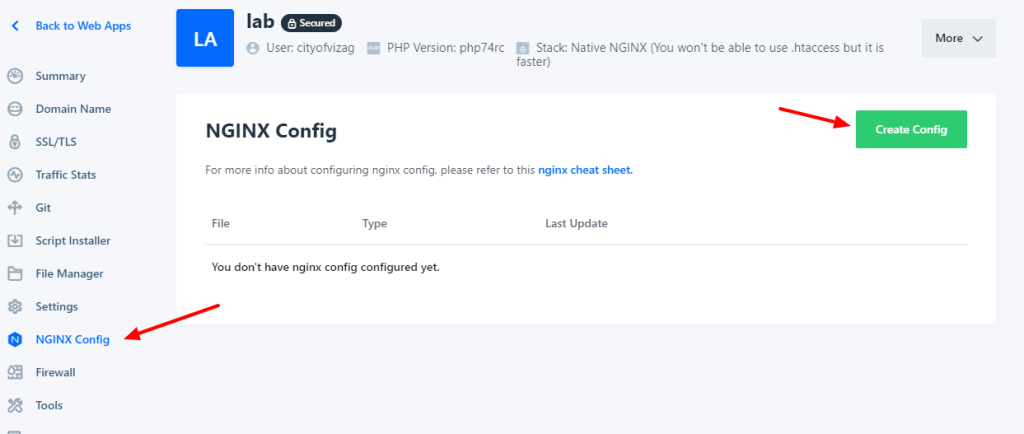
    1. Select your server and go to the Web Application page that you want to implement the WebP configuration to. Now go to NGINX Config section and click Create Config button to add new configuration.

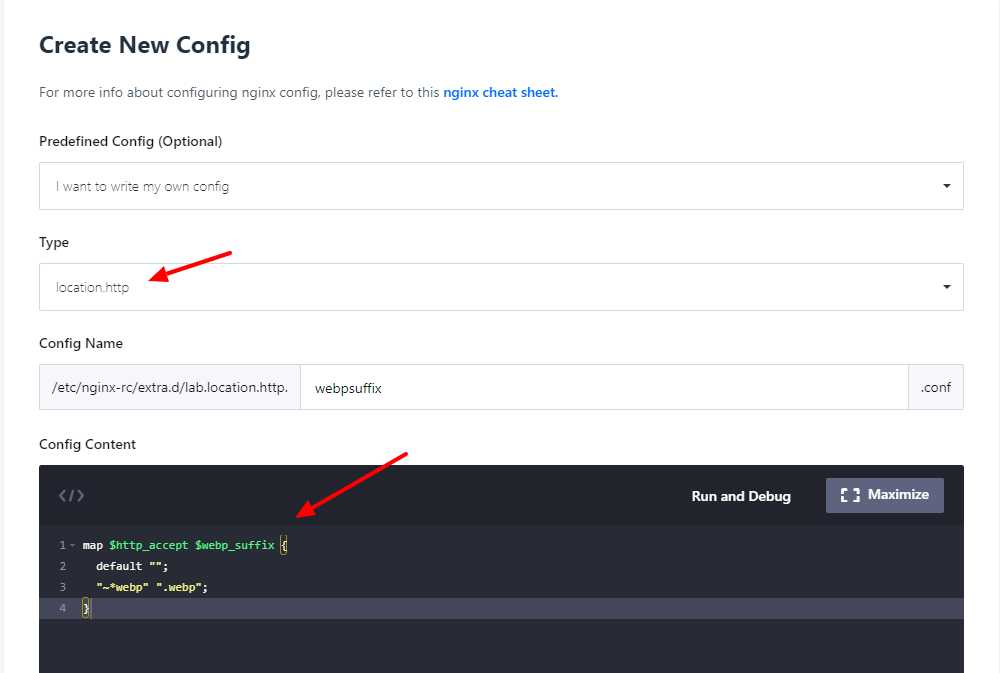
    2. Now, we have to add two configuration blocks. The first one is a map directive to http config and to add this click on Create Config and select “I want to write my own config” and then, select “location.http” under Type dropdown. Then, give the file a name and add the Nginx map code given below.

    map $http_accept $webp_suffix {
      default "";
      "~*webp" ".webp";
    }

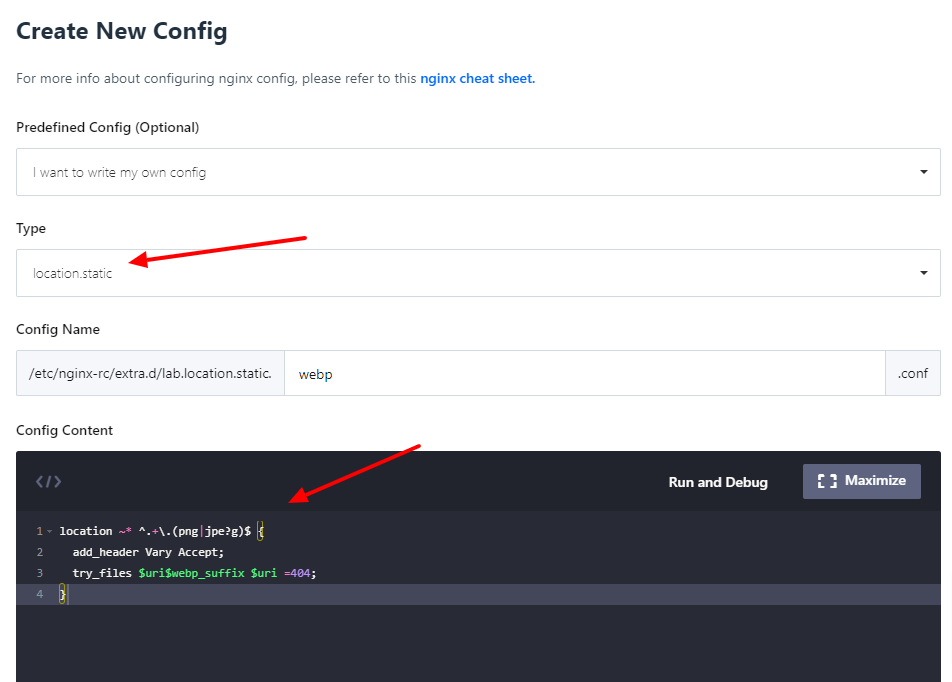
    3. Now, we have to add a location block to handle PNG and JPG images that might have WebP versions available on the server. Now, click on Create Config again and this time select type as “location.static” because the image files are static files, and it includes it in the server block only.

    Next, give it a name and add the following code.

    location ~* ^.+\.(png|jpe?g)$ {
      add_header Vary Accept;
      try_files $uri$webp_suffix $uri =404;
    }

    That’s it, now you have to make sure that you have EWWW Image Optimizer or any other WebP conversion plugin set up on the site and for every JPG or PNG file, you have its WebP version of the file available in the same directory.

    Feel free to ask any questions in the comment section. I would be very happy to help you. If you are looking for professional help with improving the speed of your website, then visit WordPress Speed Optimization Service by wpboys.

    Note: you can view EWWW Image Optimizer plugin documentation in this URL to know more about Nginx configuration set up https://docs.ewww.io/article/16-ewww-io-and-webp-images