I use runcloud to manage most of my Linux servers, so i have given screenshots of runcloud servers. But you can follow the steps to achieve the same in any Linux server.
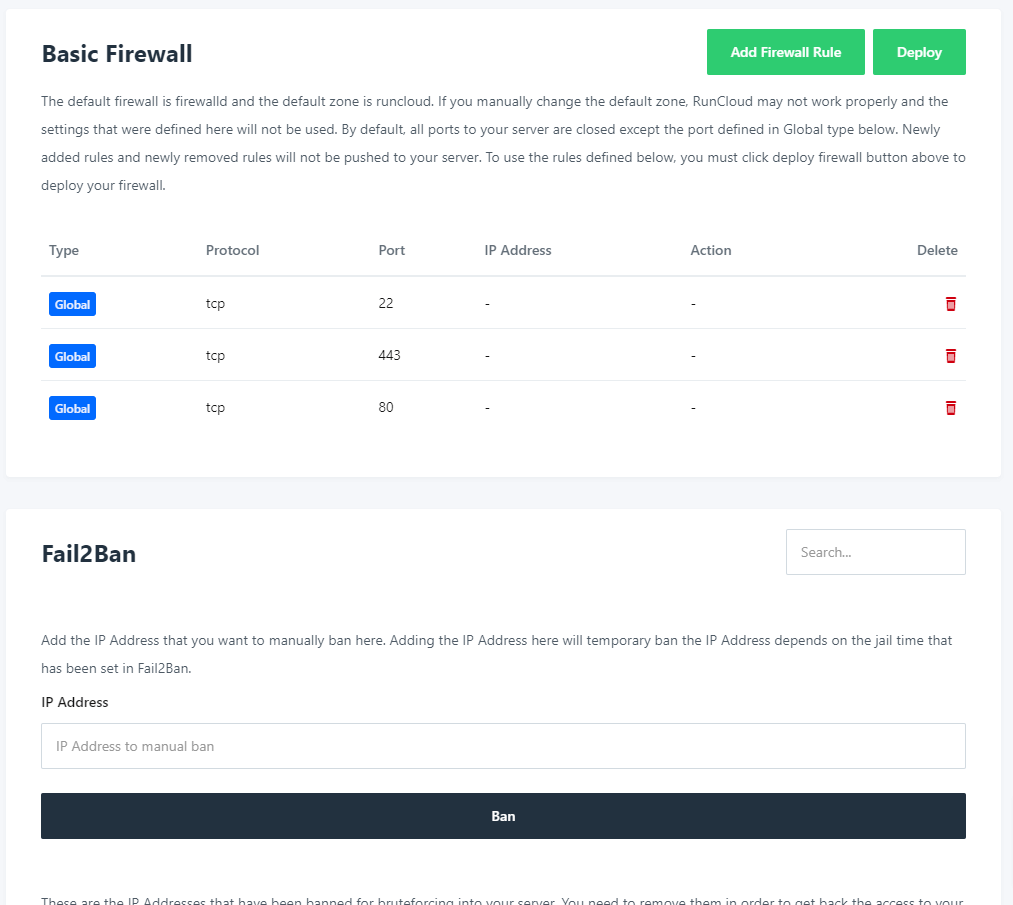
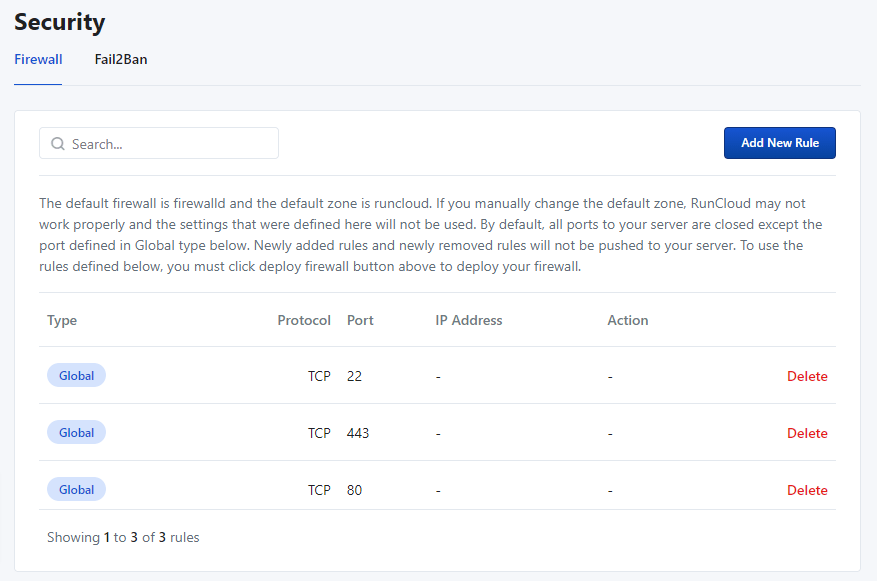
By default, runcloud has ports 22 (ssh), 80(HTTP), and 443(HTTPS) open, and port 22 is secured by the fail2ban application.
Runcloud Firewall Settings in old UI
Runcloud Firewall Settings in new UI interface
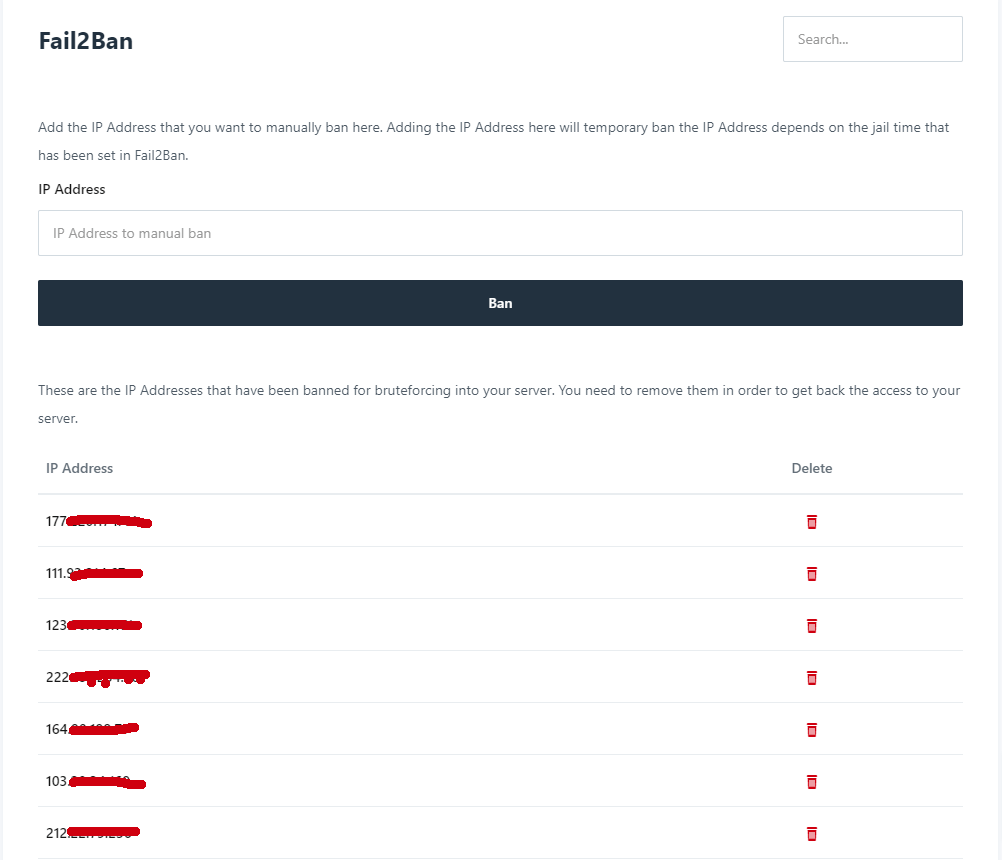
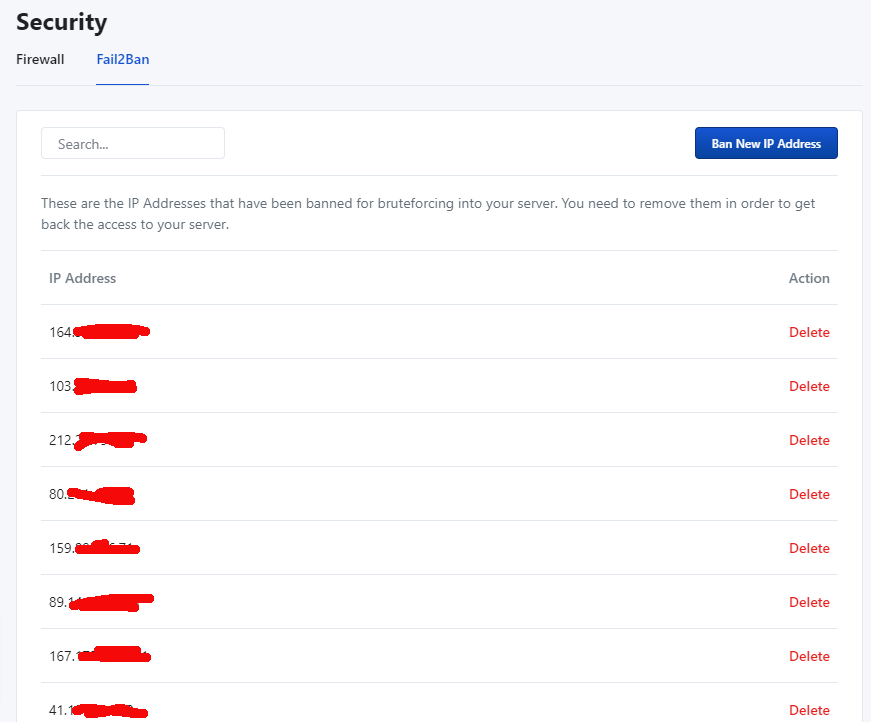
If you scroll down further on the security page or go to the fail2ban tab on the runcloud new interface, you will see a lot of IP addresses in the list depending on how popular your site is with attackers. 🙂
fail2ban in runcloud with a list of blocked IP addresses
fail2ban in runcloud with a list of blocked IP addresses in the new UI.
Most of the attackers or bots just scan the default ssh port 22. So, It’s a good idea to change the ssh port to something else.
How to change ssh port in your Linux server
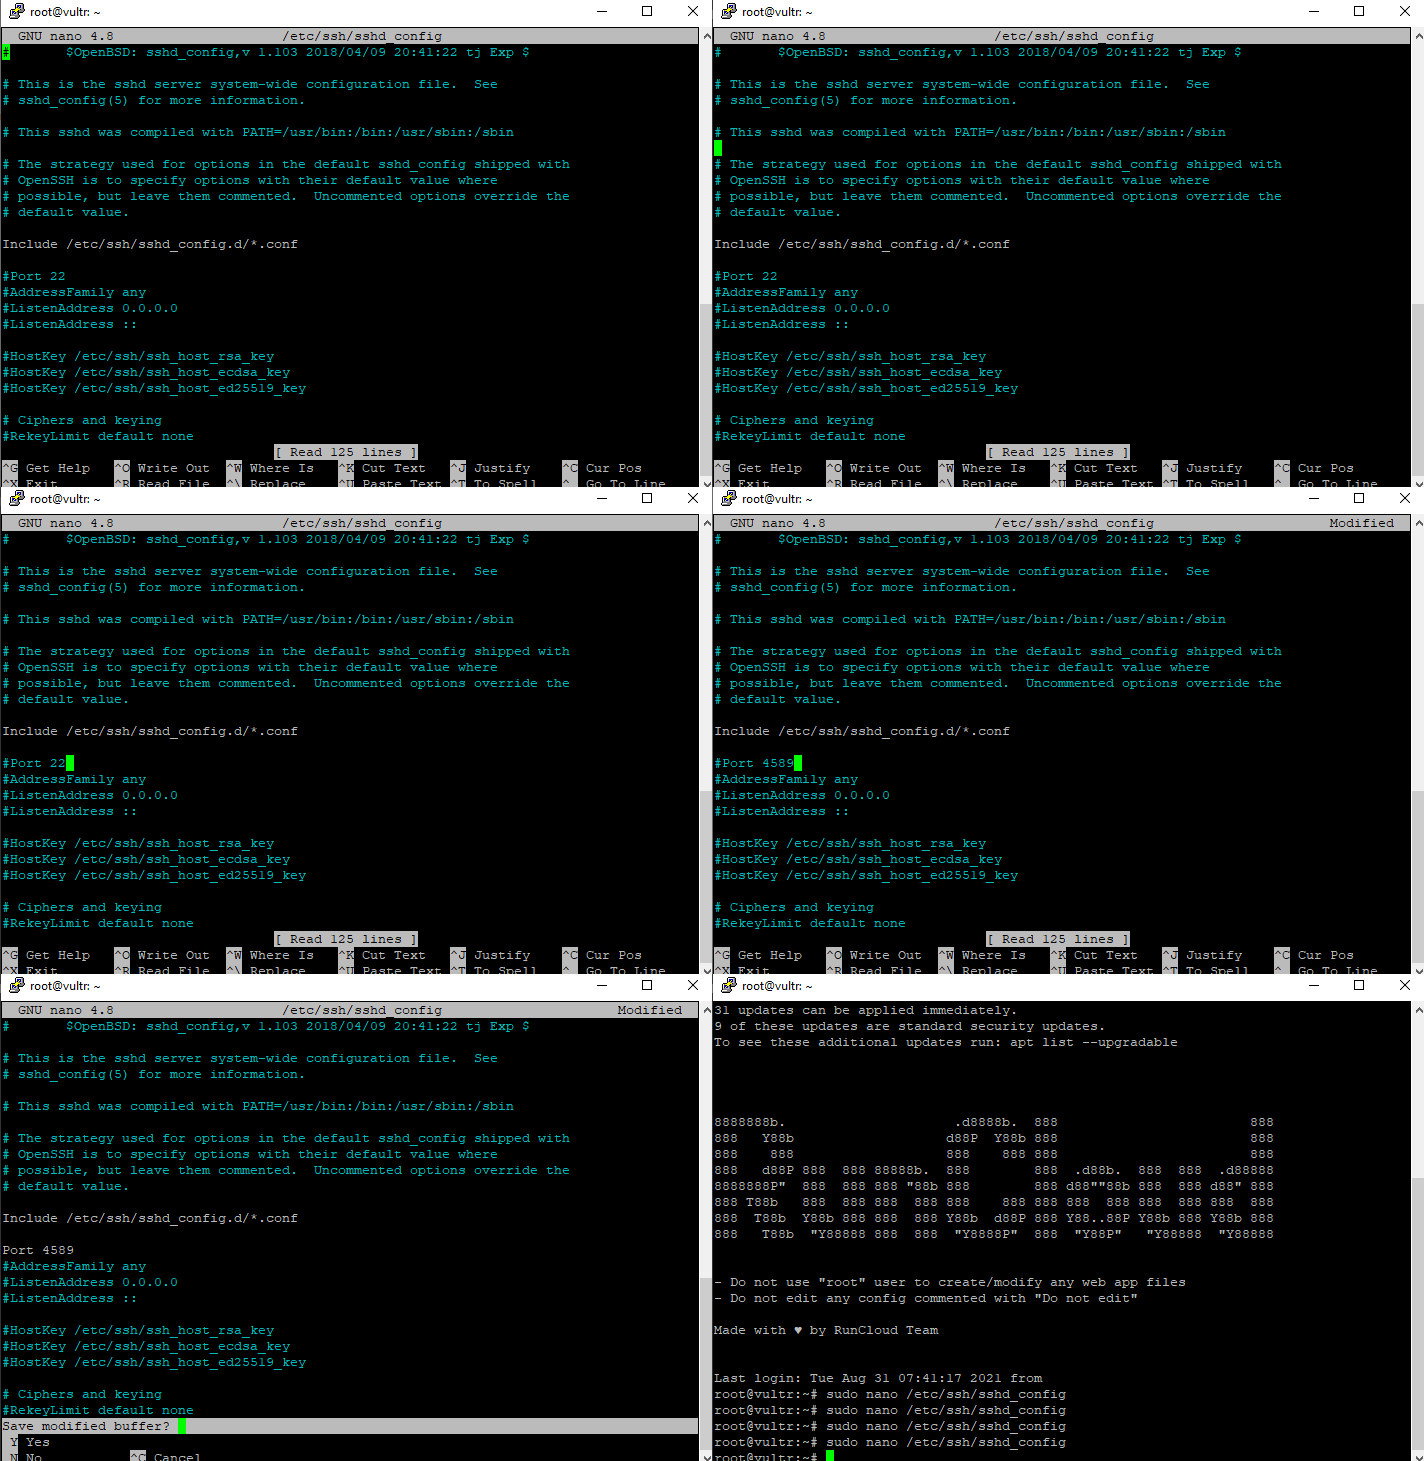
Run the following command to edit sshd config file and change the port number sudo nano /etc/ssh/sshd_config
2. Go to #Port 22 section and change the port number. You will have to remove the hash(#) symbol as well, to uncomment it. And then save the file.
3. Next, you will have to restart the SSHD daemon by the following command : sudo service sshd restart
How to configure fail2ban to secure the new custom port instead of default ssh port 22
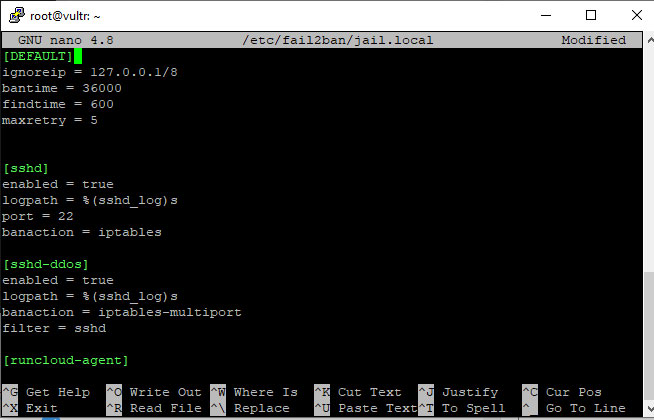
Edit the fail2ban jail.local file using the following command : sudo nano /etc/fail2ban/jail.local
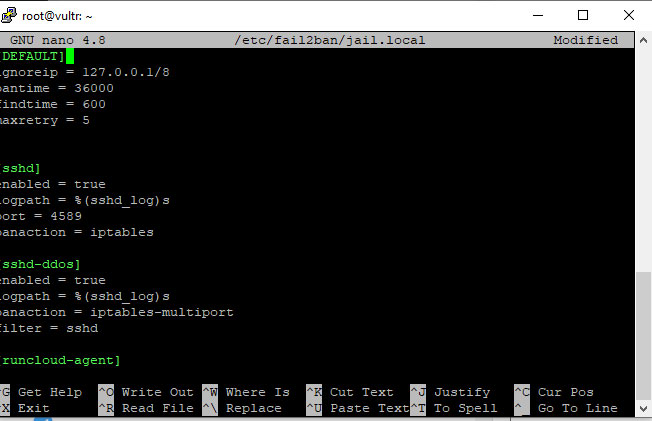
2. Now go to the SSHD section and change port number from 22 to your desired port number. Make sure that it’s the same number as your new ssh port.
3. Now, save the file and restart with the following command : sudo service fail2ban restart
Now, your server ssh port is changed and the new ssh port is also secured by fail2ban.
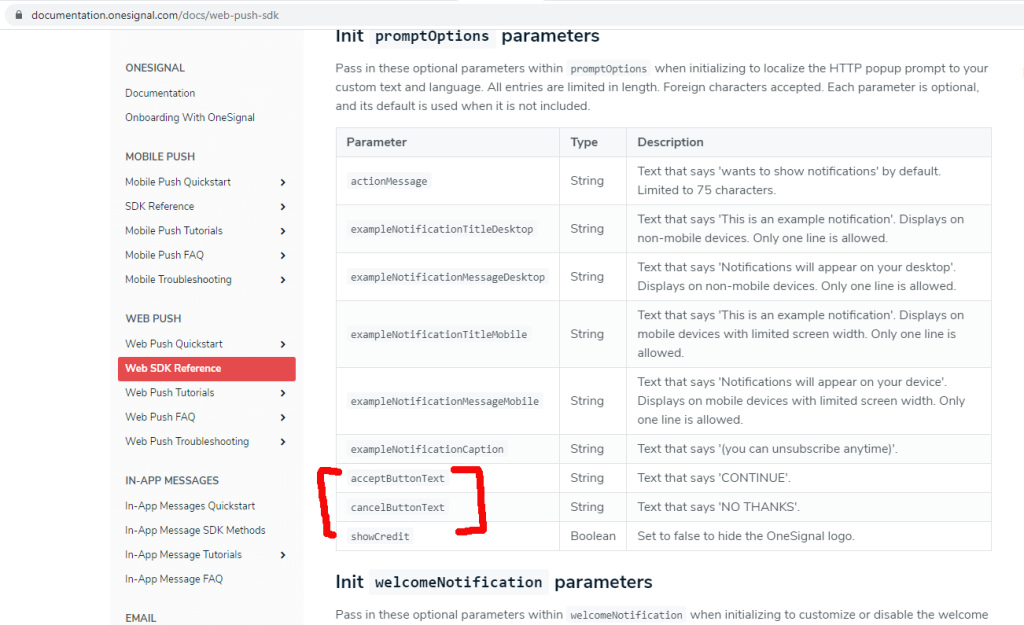
Recently, I had to initialize OneSignal with a custom call and realized that the custom text for prompt was not working. I wanted it to say “No Thanks” instead of the cancel button as per the screenshot below.
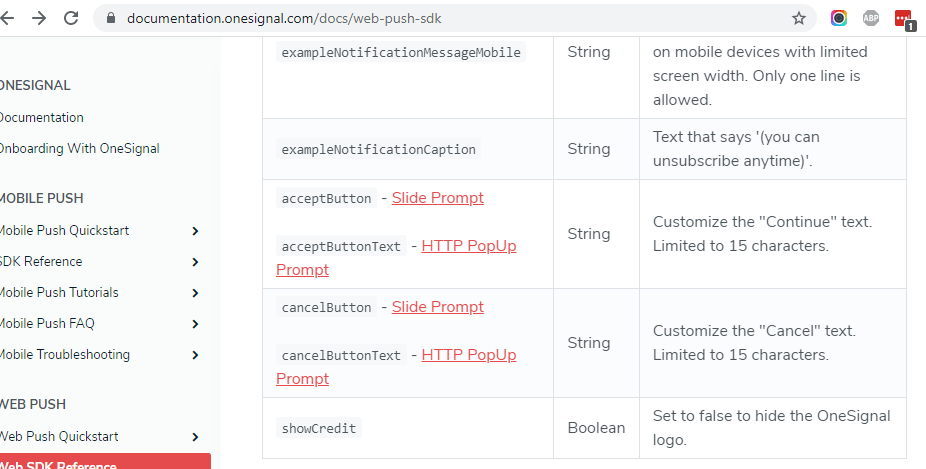
As per the documentation, acceptButtonText can be used to customize the prompt button text for “Accept” and cancelButtonText can be used to customize the button text for “Cancel”. But It never worked for me. So, I tried contacting OneSignal and found out that the information given in the documentation is wrong. We have to use acceptButton and cancelButton instead, and that fixed the issue.
OneSignal has finally updated their documentation at https://documentation.onesignal.com/docs/web-push-sdk , to clarify that acceptButton and cancelButton are for slide prompt and acceptButtonText and cancelButtonText is for HTTP PopUp Prompt.
You can use the WooCommerce filter woocommerce_get_price_html and woocommerce_cart_item_price to add a string before or after the price in WooCommerce product and cart pages.
Here is the code that you can copy and paste in your active theme’s functions.php file:
function wptips_custom_html_addon_to_price( $price, $product ) {
 $html_price_prefix = '<span class="price-prefix">prefix</span>'; // custom prefix html that you want to add before price
 $html_price_suffix = '<span class="price-suffix"> suffix</span>'; // custom suffix html that you want to add after price

 if ( !empty( $price ) ) {
	 $price = $html_price_prefix . ' ' . $price . ' ' . $html_price_suffix;
	  return $price;
	} else {
	  return $price;
	}
}
add_filter( 'woocommerce_get_price_html', 'wptips_custom_html_addon_to_price', 999, 2 );
add_filter( 'woocommerce_cart_item_price', 'wptips_custom_html_addon_to_price', 999, 2 );
You can use the above simple code snippet in your active theme, or use the code in a custom plugin to add text next to the price in WooCommerce. You can also add a prefix or suffix HTML or TEXT to the price on the product page and cart page as well.
You can use EWWW Image Optimizer plugin to serve WebP images on your website. But you will have to implement some Nginx configurations in your RunCloud server to be able to achieve it. Follow the instructions below.
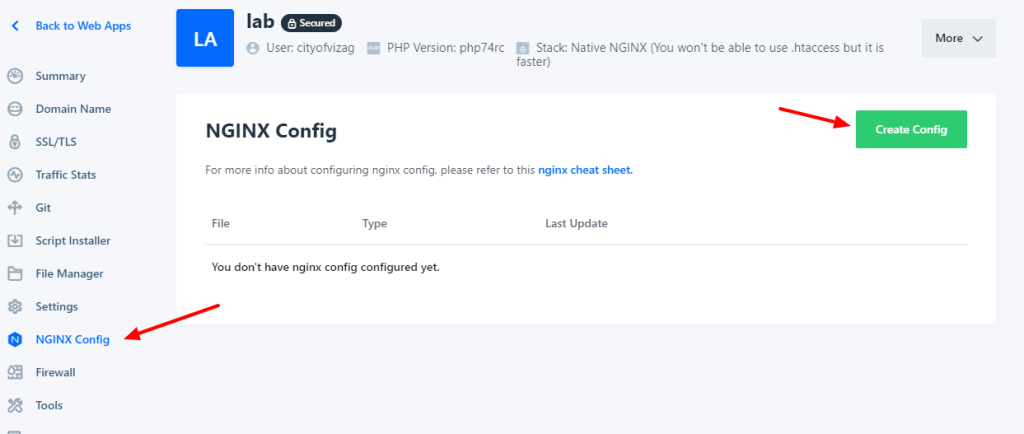
Select your server and go to the Web Application page that you want to implement the WebP configuration to. Now go to NGINX Config section and click Create Config button to add new configuration.
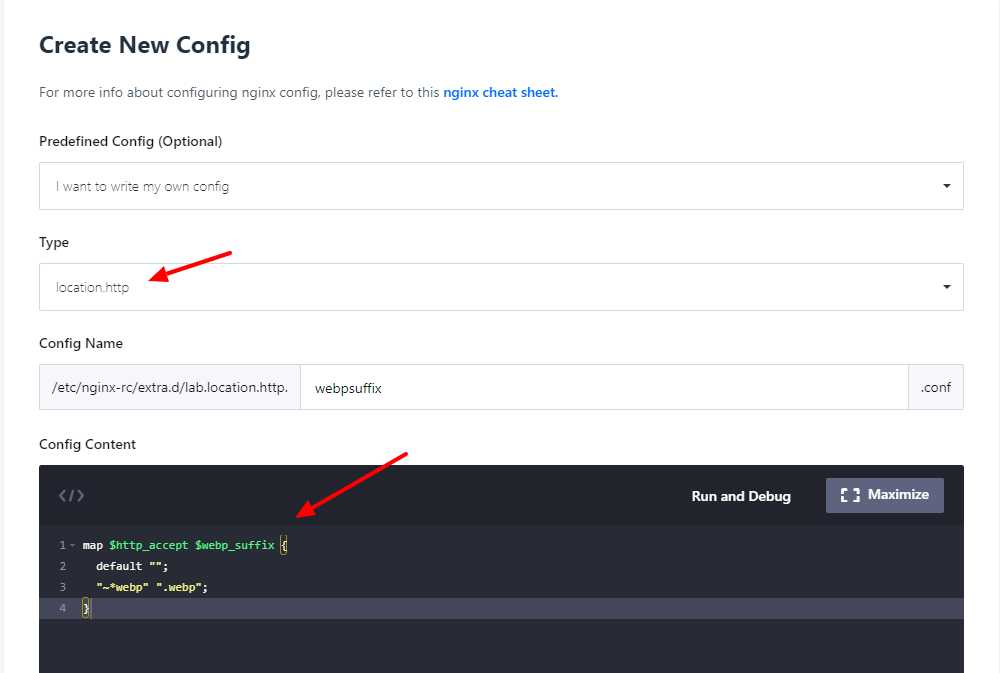
2. Now, we have to add two configuration blocks. The first one is a map directive to http config and to add this click on Create Config and select “I want to write my own config” and then, select “location.http” under Type dropdown. Then, give the file a name and add the Nginx map code given below.
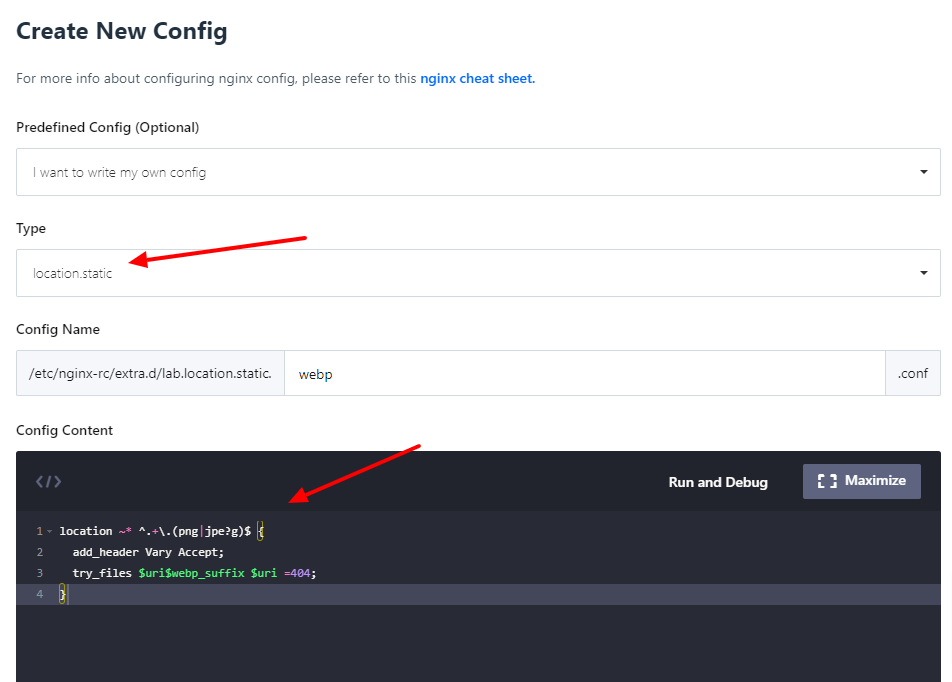
3. Now, we have to add a location block to handle PNG and JPG images that might have WebP versions available on the server. Now, click on Create Config again and this time select type as “location.static” because the image files are static files, and it includes it in the server block only.
That’s it, now you have to make sure that you have EWWW Image Optimizer or any other WebP conversion plugin set up on the site and for every JPG or PNG file, you have its WebP version of the file available in the same directory.
Feel free to ask any questions in the comment section. I would be very happy to help you. If you are looking for professional help with improving the speed of your website, then visit WordPress Speed Optimization Service by wpboys.
Recently, I got a request to add additional text under the product name on the checkout page. It seemed an easy job. All I had to do was create a file at woocommerce/checkout/review-order.php in, the active theme’s directory. But it didn’t work. Because the CartFlow plugin was overwriting some WooCommerce templates.
List of WooCommerce templates that CartFlow plugin overwrites :
Cart
cart/cart-shipping.php
Checkout
checkout/form-billing.php
checkout/form-checkout.php
checkout/form-coupon.php
checkout/form-login.php
checkout/form-shipping.php
checkout/payment.php
checkout/payment-method.php
checkout/review-order.php
checkout/thankyou.php
Global
global/form-login.php
Notices
notices/error.php
notices/notice.php
notices/success.php
Order
order/order-details.php
Now, all we have to do is use, “woocommerce_locate_template” filter to force woocommerce to use our custom defined templates, instead of the templates defined in CartFlow.
Here is the code snippet to overwrite CartFlow templates :
// source : https://wordpress.org/support/topic/cartflows-overwrites-woocommerce-templates-in-child-theme/

add_filter( 'woocommerce_locate_template', 'wptips_locate_template', 21, 3 );

function wptips_locate_template( $template, $template_name, $template_path ){

	global $woocommerce;
		$_template = $template;

		if ( ! $template_path ) {
			$template_path = $woocommerce->template_url;
		}

        //You can change this Path to match your plugin or theme , where you have defined custom woocommerce templates.
		$my_woocommerce_template_path = get_bloginfo('stylesheet_directory') . '/woocommerce/';
		$template    = locate_template(
			array(
				$template_path . $template_name,
				$template_name,
			)
		);
		// Get the template from the active theme, if it exists
		if ( ! $template && file_exists( $my_woocommerce_template_path . $template_name ) ) {
			$template = $my_woocommerce_template_path . $template_name;
		}
		// Use default template
		if ( ! $template ) {
			$template = $_template;
		}
		// Return what we found
		return $template;
}
You can implement the above code in your theme’s functions.php file, and it will force WooCommerce to use the templates defined in your active theme.
Feel free to comment here, if you have any questions. I would love to help you out. 🙂
You can add an extra layer of security to your WordPress website using the Cloudflare service. Here is a list of rules that you can apply to your website in Cloudflare settings to improve security.
Secure WordPress login page and administrator section
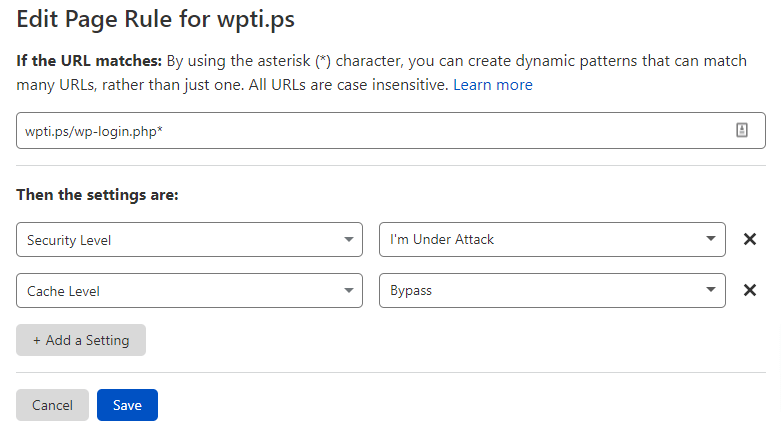
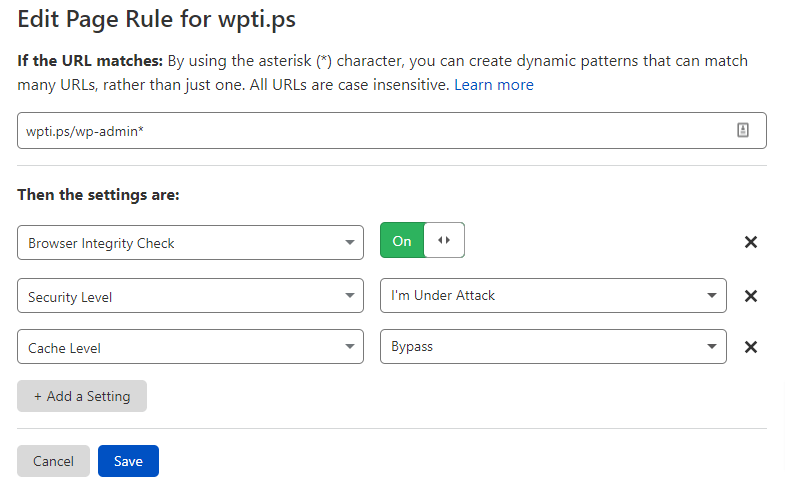
Secure WordPress admin and login URL from bot attacks by making sure that you add rules as per the given screenshot below.
Secure wp-login.php URL Secure WordPress admin section and disable cache
Disable access to the xmlrpc.php file
You can disable access to the xmlrpc.php file and allow only certain IP addresses. You may want to allow Jetpack or any other service.
The AS Number 2636 is jetpack number, you can use it to whitelist jetpack services.
You can copy the expression code below to implement the rule.
(http.request.uri.path eq "/xmlrpc.php" and ip.geoip.asnum ne 2635)
You can also completely block access to the xmlrpc.php file via the expression below.
(http.request.uri.path contains "xmlrpc.php")
Block xmlrpc.php file completely using Cloudflare firewall rule.
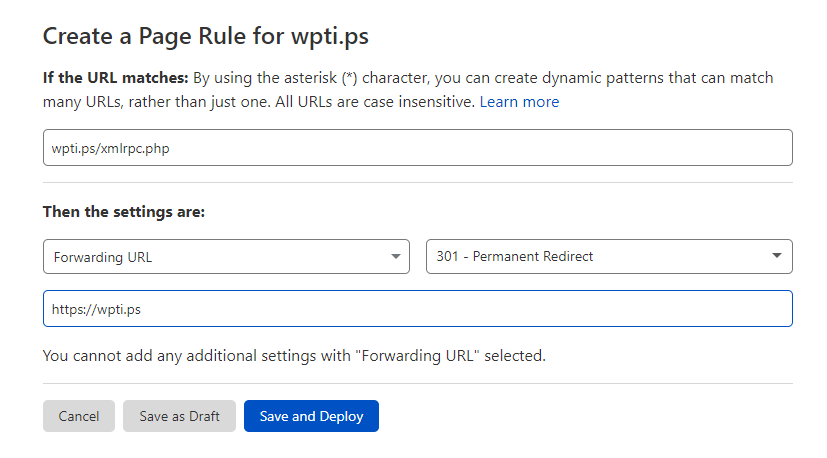
You can also redirect any traffic to xmlrpc.php file to home page or any other URL using page rule.
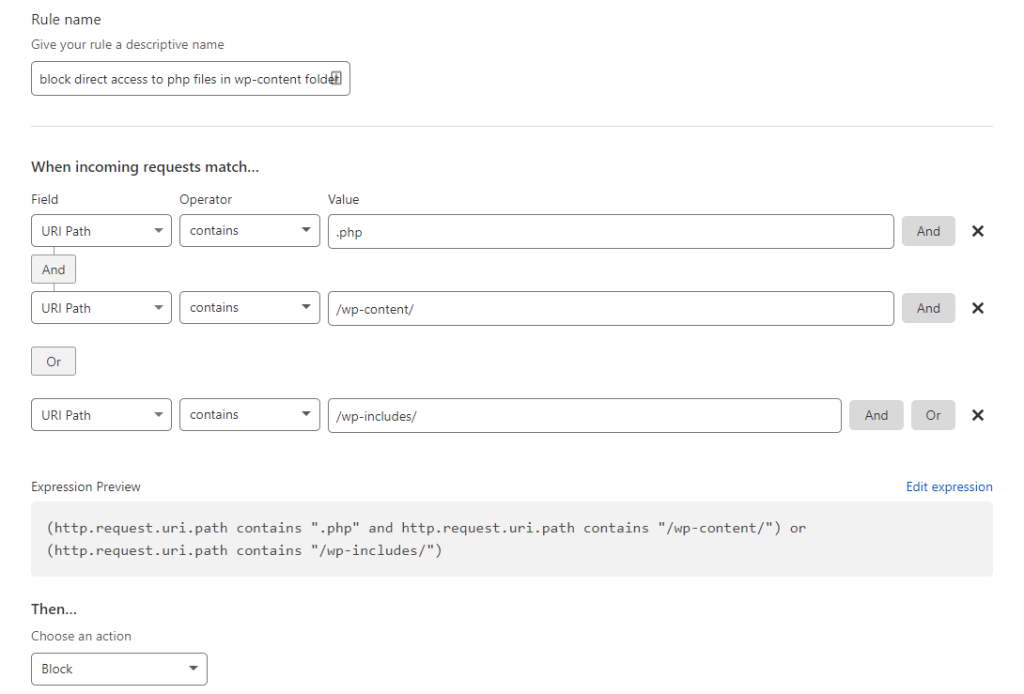
Block direct access to PHP files in the wp-content and wp-include folder
Direct access of PHP file can be blocked in wp-content or wp-includes folder.
Add Captcha or Challenge users who have a higher threat score
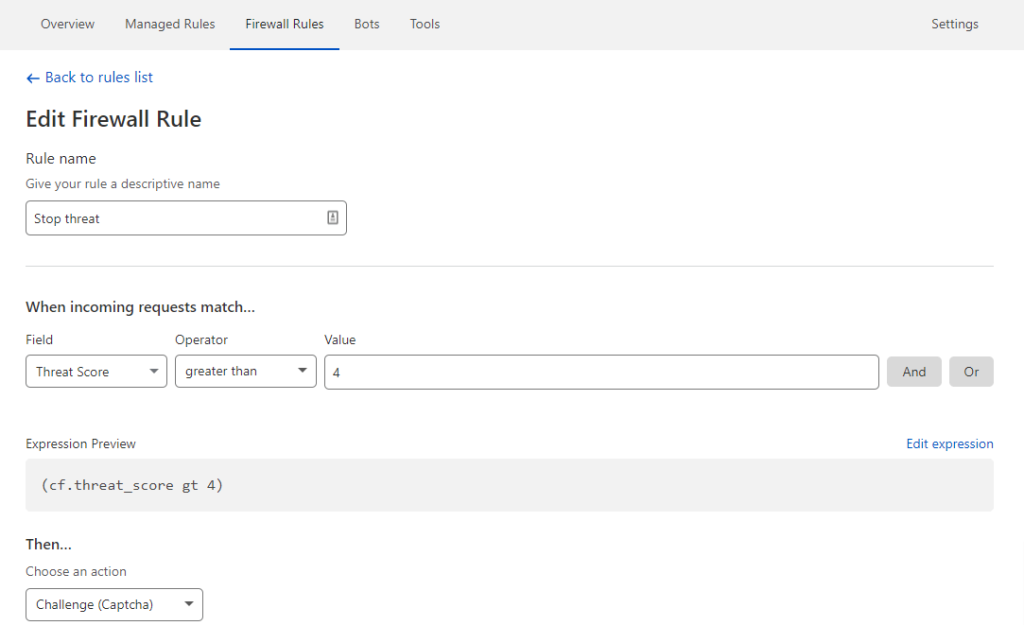
Cloudflare has a Threat Score system, that gives a score to IP addresses based on their reputation. You can use it to block or challenge visitors with captcha. Use this option carefully not to block or discourage your real human visitors.
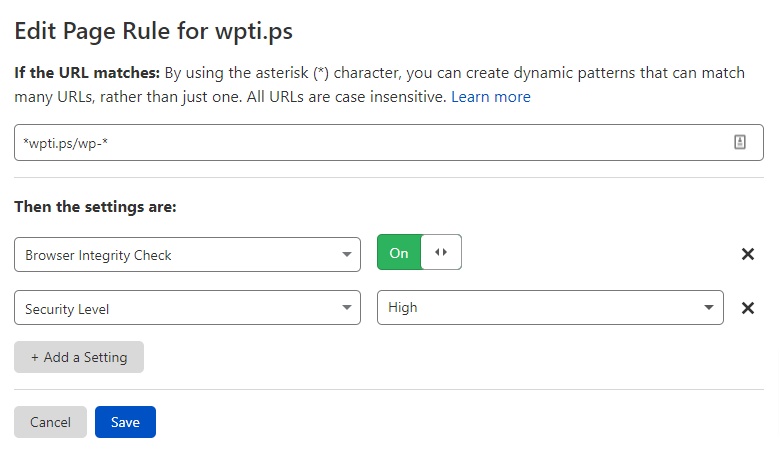
Secure requests with “wp-“
You can also secure any URL that has wp- , remember to put this rule below the wp-admin or wp-login.php RULE.
Do you use any of the rules, or you have any questions? Let me know in the comment section 🙂
There is no option to hide the tagline or site description in the Twenty Twenty theme. You can follow the steps below to hide the tagline.
Step 1: Go to Customize under Appearance
Step 2: Go to the Additional CSS section & add the following CSS code. After adding the code, you will have to hit the publish button, so that the changes have been saved.
.site-description{display:none;}
Tip: You can also hide the tagline by making the Tagline field empty. You can find it under Settings >> General.
How to hide Tagline for Twenty Twenty-One theme:
Step 1: Go to Customize under Appearance
Step 2: Navigate to Site Identity
Step 3: Uncheck the option where it says, “Display Site Title & Tagline”
If you are not able to hide the tagline following the above methods, do let me know in the comment section below. I would like to help you out.
If you are using an AMP-compatible theme and using the AMP plugin for AMP implementation, then sometimes you may need to check if the current page is an AMP page request or a normal page request.
AMP plugin has a built-in function that you can use to do just that. Its amp_is_request(). This function allows you to check whether the current page is an AMP request or a normal request. I have listed a few examples below with the implementation of amp_is_rquest() to achieve a few features.
Load a different sidebar for AMP pages
You may want to load a different sidebar specifically for AMP pages so that it will have complete AMP-compatible code. Here is an example how you can achieve that :
Create a custom function to check if the current AMP request that avoids errors when the AMP plugin is disabled. Add the following code in the functions.php file to do that.
// Add this function in functions.php file
// custom function to check if amp_is_request exists so that the site doesn't throw error when AMP plugin is disabled.
function wptips_is_amp() {
  if ( function_exists( 'amp_is_request' ) ):
    return amp_is_request();
  else :
    return false;
  endif;
}
Create a custom AMP sidebar and call the sidebar if it’s an AMP request using the newly defined custom function.
// Register custom AMP Sidebar ( add this code in functions.php file )
		register_sidebar(
		array(
			'name'          => __( 'AMP Sidebar', 'wptips' ),
			'id'            => 'amp-sidebar',
			'description'   => __( 'Add widgets here to appear in AMP site sidebar.', 'wptips' ),
			'before_widget' => '<section id="%1$s" class="widget %2$s">',
			'after_widget'  => '</section>',
			'before_title'  => '<div class="widget-title">',
			'after_title'   => '</div>',
		)
	);

// Add this code in your sidebar.php or any other sidebar file where you want to implement custom sidebar for AMP version of the site.
if ( wpb_is_amp() ): dynamic_sidebar( 'amp-sidebar' );	else:	dynamic_sidebar( 'main-sidebar' ); endif;
Note: The function is_amp_endpoint() is deprecated, and you should switch to amp_is_rquest() if you are using the latest version of the AMP plugin.
Feel free to share your question or any issue that you need help with related AMP implementation in your webstie.
WordPress is a wonderful open-source CMS with a lot of useful features. But another reason why WordPress is considered awesome is because of the huge set of free plugins and themes offered by developers all around the globe to help anyone get started with their website. Building your own website has never been this easy.
I have worked with hundreds of WordPress-based sites by now and with all my experience, I have found a few plugins to be very useful and can be used in almost any type of WordPress website. Here is the list of plugins that I think are must-have plugins for your WordPress website in 2021.
List of the top must have WordPress Plugins for 2021 :
Site Kit by Google
Site Kit by Google plugin was released in WordPress plugin repository towards the end of 2019. It is one of the easiest ways to integrate your website with many essential Google services like Analytics, Search Console, AdSense, Speed. You can even view search console and analytics data on your website admin dashboard. This gives you additional motivation and easy access to the numbers on your site.
Rank Math SEO plugin was released towards end of year 2018 and just within two years it has become one of the top SEO plugins for WordPress. The main reason why i recommend this plugin is that the developers of the plugin keep adding new features continuously and it has much more featured when compared to top seo plugin like Yoast SEO. It also has a very affordable paid version compared to alternatives like the Yoast SEO plugin. Rank Math SEO offers much more features in the free version compared to the features of the Yoast SEO plugin.
This plugin was released in January 2021 and includes integration to many transactional mail services, so that your WordPress website can send emails through them. It currently integrates with Amazon SES, SendGrid, MailGun, SendInBlue, PepiPost, SparkPost, Gmail , Zoho, Outlook via SMTP, and All Other SMTP.
Sending emails to your customers or subscribers from your website reliably from your WordPress website is very important, and you will need a reliable plugin to integrate. The plugin also allows you to view email logs.
This is the best lightweight and free comment spam protection plugin for WordPress that I have found. It just works like magic, with no settings to change. Just install the plugin and activate. I have tested on many sites and it has worked very well.
Security is a very important aspect of your website and should not be neglected. I strongly suggest having a security plugin on your website to protect your site from various attacks. Wordfence is one of the best free security plugins available. Wordfence Security plugin has Web Application Firewall, Malware Scanner, Login security with two-factor authentication, Monitor & track hacking attempts, IP address blocking.
Wordfence Security also has the feature called Wordfence Central. You can register all your sites in Wordfence Central and monitor the security status and manage Wordfence Security plugin settings for free.
Image optimization is a very important part of websites speed optimization and EWWW Image Optimizer is one of the best free image optimization plugins to implement and serve images in WebP format.
JavaScript files and CSS files optimization is essential in improving website page load time. Autoptimize has all features that you will need for JS, CSS, and HTML optimization and modification. You can also implement CDN for the optimized files or change the folder from which the files can be served.
Off-site backup of your WordPress website will ensure that your website can be restored easily after any security incident or any major error. This is one of the best free WordPress backup plugins.
Almost every website needs a contact form to get visitors to communicate. Even though there are many free contact plugins, the Ninja forms plugin stands out by being one of the easiest contact form plugins to use and get started.
This is a free plugin that allows you to implement live chat feature in your website. You need to have an account with Tawk.to website to be able to use this plugin.
WPS Hide Login
The most common attack on a WordPress website is bruteforce attack on the website login page (wp-login.php). This plugin allows you to point login to a different custom URL, allowing you to block the majority of the attacks on your website.
From my experience of working with numerous websites, I have found that all the above plugins are very helpful in almost any WordPress website. Do you think, I missed any plugin that you think is promising, and I should include it? Please comment below and let me know.
If you are using the PWA plugin on your website, you may have to do a few changes to the website to get OneSignal push notifications to work properly.
PWA implementation needs adding a service worker to the site. OneSingal also needs to have service worker implementation so that, it can allow users to subscribe for push notifications. We have to change the service worker scope, keeping the service worker path the same to get OneSignal to work properly.
1) Disable OneSignal initialization
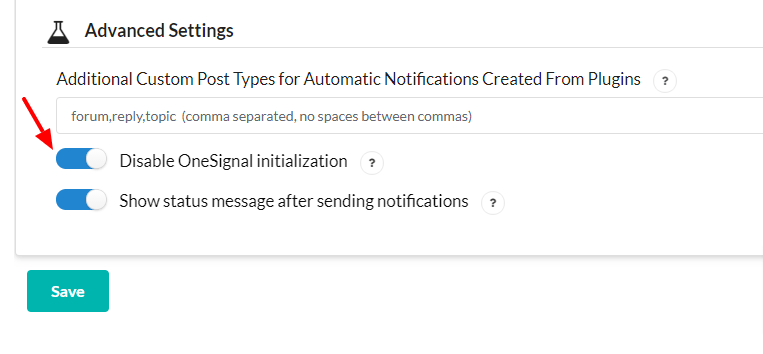
Go to OneSignal setting page called OneSignal Push in your WordPress website admin section and scroll down to Advanced Settings. There, you will have to check the option to Disable OneSignal initialization. Now in the next step, we will have to insert custom JavaScript code, which will do the OneSignal Initialization.
Step 2: You can add the following JavaScript code right before </head>(head tag close), Which initializes the OneSignal and Custom prompt notification.
note : The above code had acceptButtonText and cancelButtonText as per referenced from the documentation of onesignal website at the time of writing. But after communicating with OneSignal, I finally got it corrected. The actual variables to customize OneSignal notification prompt is acceptButton and cancelButton. The code was updated on 29th August, 2021.